Welcome to the Xencelabs website
Select country or region to browse the content that applies to your location.


recommend
- Pen Display 24
- Pen Tablet Medium
Welcome to the Xencelabs website
Select country or region to browse the content that applies to your location.
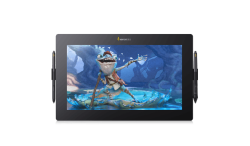
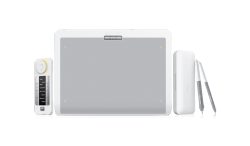
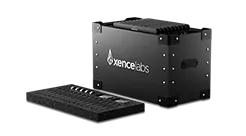
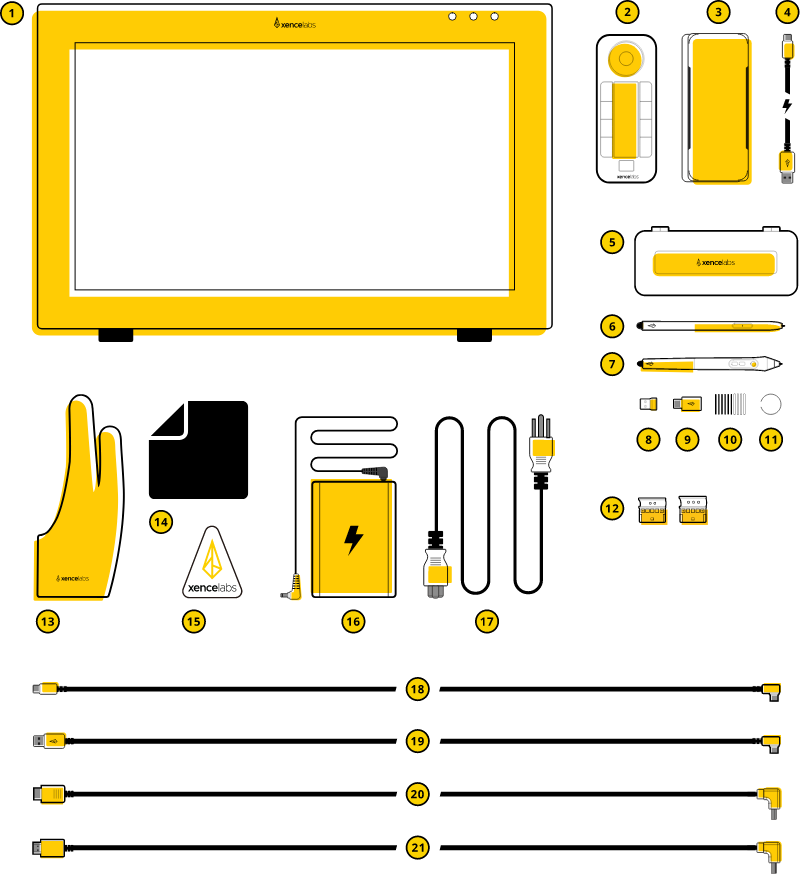
Pen Display 24/24+
Quick Keys
Quick Keys Holder
0.6m USB-C to USB-A 3.0
(standard) cable
Pen Case
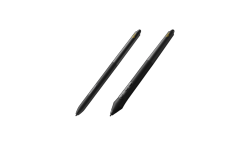
Thin Pen v2
3 Button Pen v2
Wireless Dongle
(For use with Quick Keys)
USB-A to USB-C Adapter
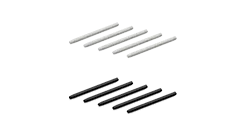
Nibs v2 - 6 standard, 4 felt
Nib Extracting Ring
Pen Clips
(Two sizes)
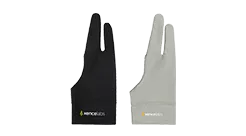
Drawing Glove Medium
Cleaning Cloth
Xencelabs Decal
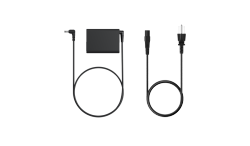
AC Power Adapter with
L-Shaped Connector
Power Cable(s)
(Varies by region)
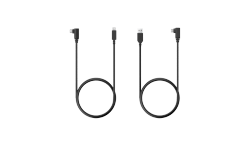
2m USB-C to USB-C
(L-shaped) cable
2m USB-C to USB-A 3.0
(L-shaped) cable
2m HDMI2.0 to HDMI2.0
(L-shaped) cable
2m DisplayPort to DisplayPort
(L-shaped) cable
Warranty Sheet and
Thank-You Card (not shown)
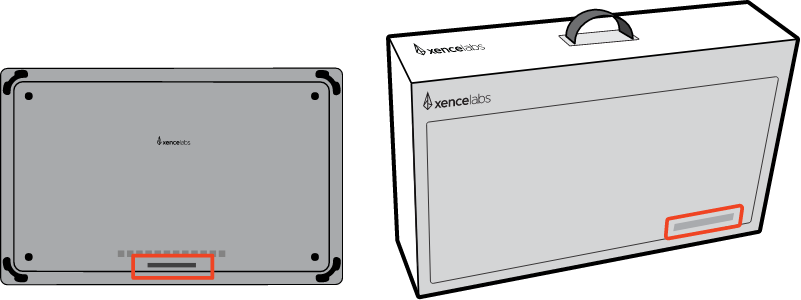
Please keep the box for future shipping or transportation needs.
Pen Display 24/24+
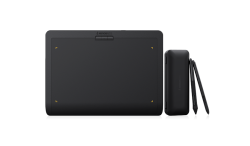
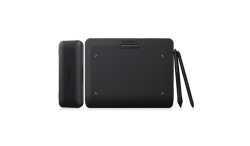
Quick Keys
Quick Keys Holder
Wireless Dongle
(For use with Quick Keys)
3 Button Pen v2
Thin Pen v2
Pen Clips
(Two sizes)
AC Power Adapter with
L-Shaped Connector
Power Cable(s)
(Varies by region)
2m USB-C to USB-C
(L-shaped) cable
2m USB-C to USB-A 3.0
(L-shaped) cable
2m HDMI2.0 to HDMI2.0
(L-shaped) cable
2m DisplayPort to DisplayPort
(L-shaped) cable
Warranty Sheet and
Thank-You Card (not shown)
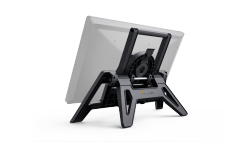
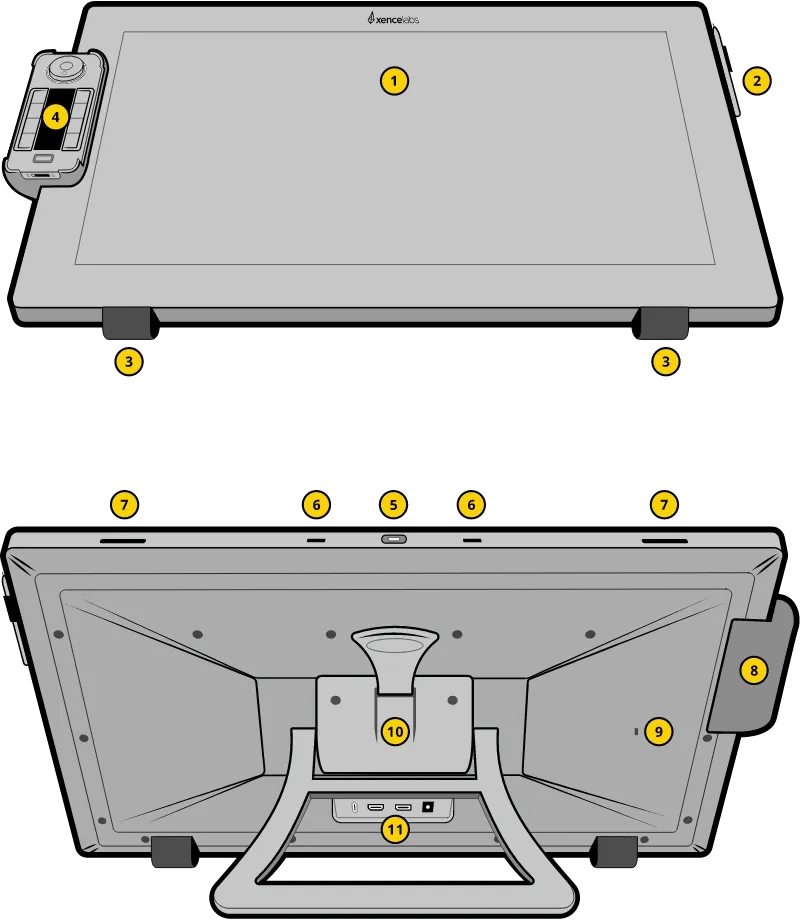
The display ships with the Tilt Stand collapsed flush against the back of the display. Prior to setting up the display, adjust the angle of the stand such that it won't topple over.
Shown with tilt stand engaged.
Shown in the small pen clip.
Shown attached to the bottom two accessory clip slots.
Shown in the attached holder.
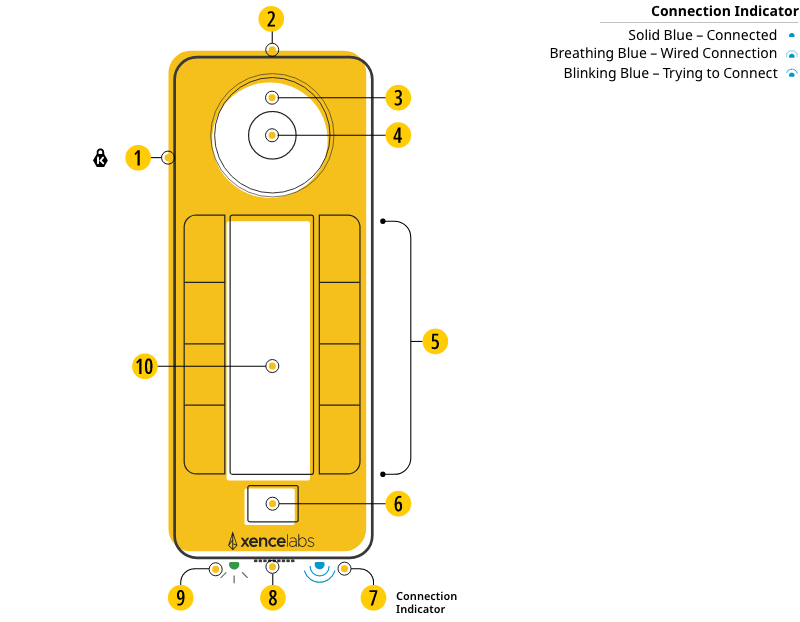
Hold for 2 seconds to turn on/off. The display will follow OS sleep settings. Customizable wake options are in the Settings Panel.
Use with the Wireless Dongle to connect the Quick Keys.
There are 8 in total, 2 on each side of the display. To be used with the pen clips.
Slides on anywhere along the edge of the Pen Display.
Compatible with Kensington MicroSaver® 2.0 Lock.
Shown engaged. Stand is removable. It is drilled for VESA 100 x 100 mounts and uses M4 screws.
USB-C, HDMI, DisplayPort, and Power Connector.
Because the Pen Display 24/24+ is designed to radiate heat out the back, no fans or heat vents are needed making it very quiet.
The Pen Display's video-data-power ports are located on the back of the display.
To easily view and access these ports, we suggest using the foam packing pad the display was shipped with as a cushioned mat. Place the foam pad on a flat surface such as a tabletop, then lay the display face down on the foam pad. As you plug in the cables, do not route them through the tight space between the top of the stand leg and tilting arm. This may damage the cables at low tilt angles.
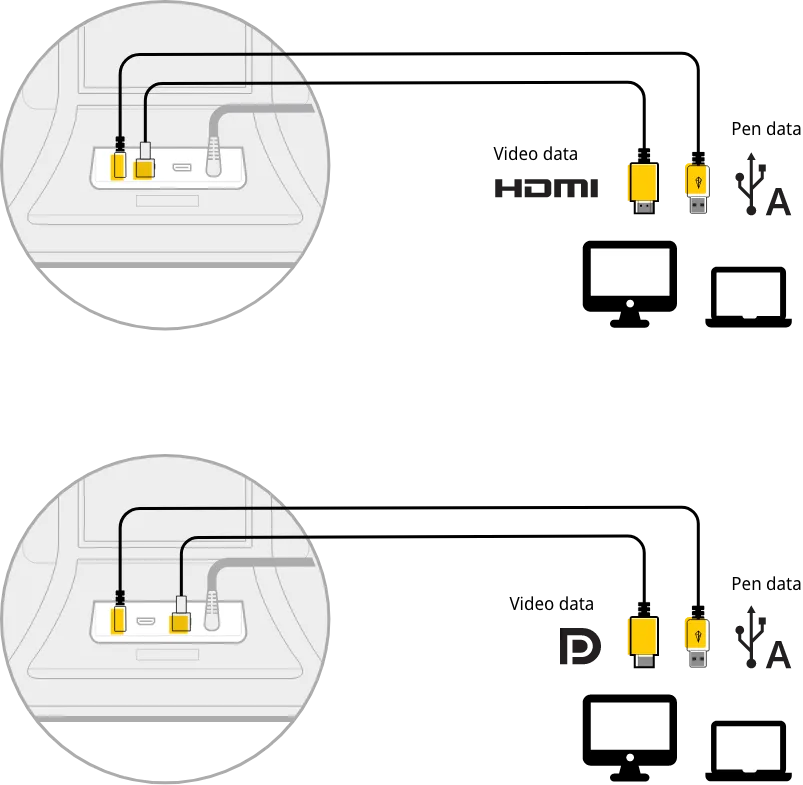
For the pen display to work properly it needs to be connected to power, and it also needs both video and pen data to flow between it and your computer. The cable combination that works for you will depend upon the type of ports your computer has.
If your computer has a USB-C port, you should be able to use only the USB-C to USB-C cable. This is a special connection type that's capable of passing both video and pen data at the same time.
AC Power Adapter with L-shaped connector
2m USB-C to USB-C (L-shaped) cable
If your computer does not have a USB-C port and instead has an HDMI port or DisplayPort, then you'll want to use one of those cables in combination with the USB-A cable. The HDMI or DisplayPort cables pass video data and the USB-A cable passes pen data.
Please do not use an HDMI, DisplayPort or USB-C cable together. This may cause a duplication of the video data to be sent to your computer, making your OS think you have multiple pen displays attached.
Your pen display is working properly when your cursor follows your pen movement.
Select your operating system and download your driver. After following the guided install, restart your system. Restarting is essential for the driver to function properly.
Kensington NANO Security Slot™.
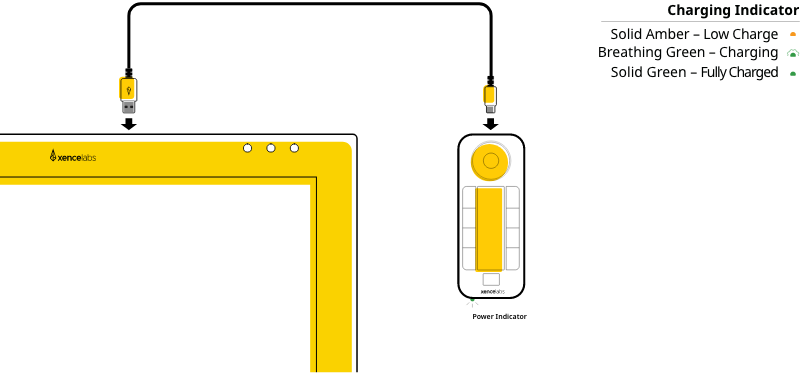
Charge the battery and/or connect to the computer.
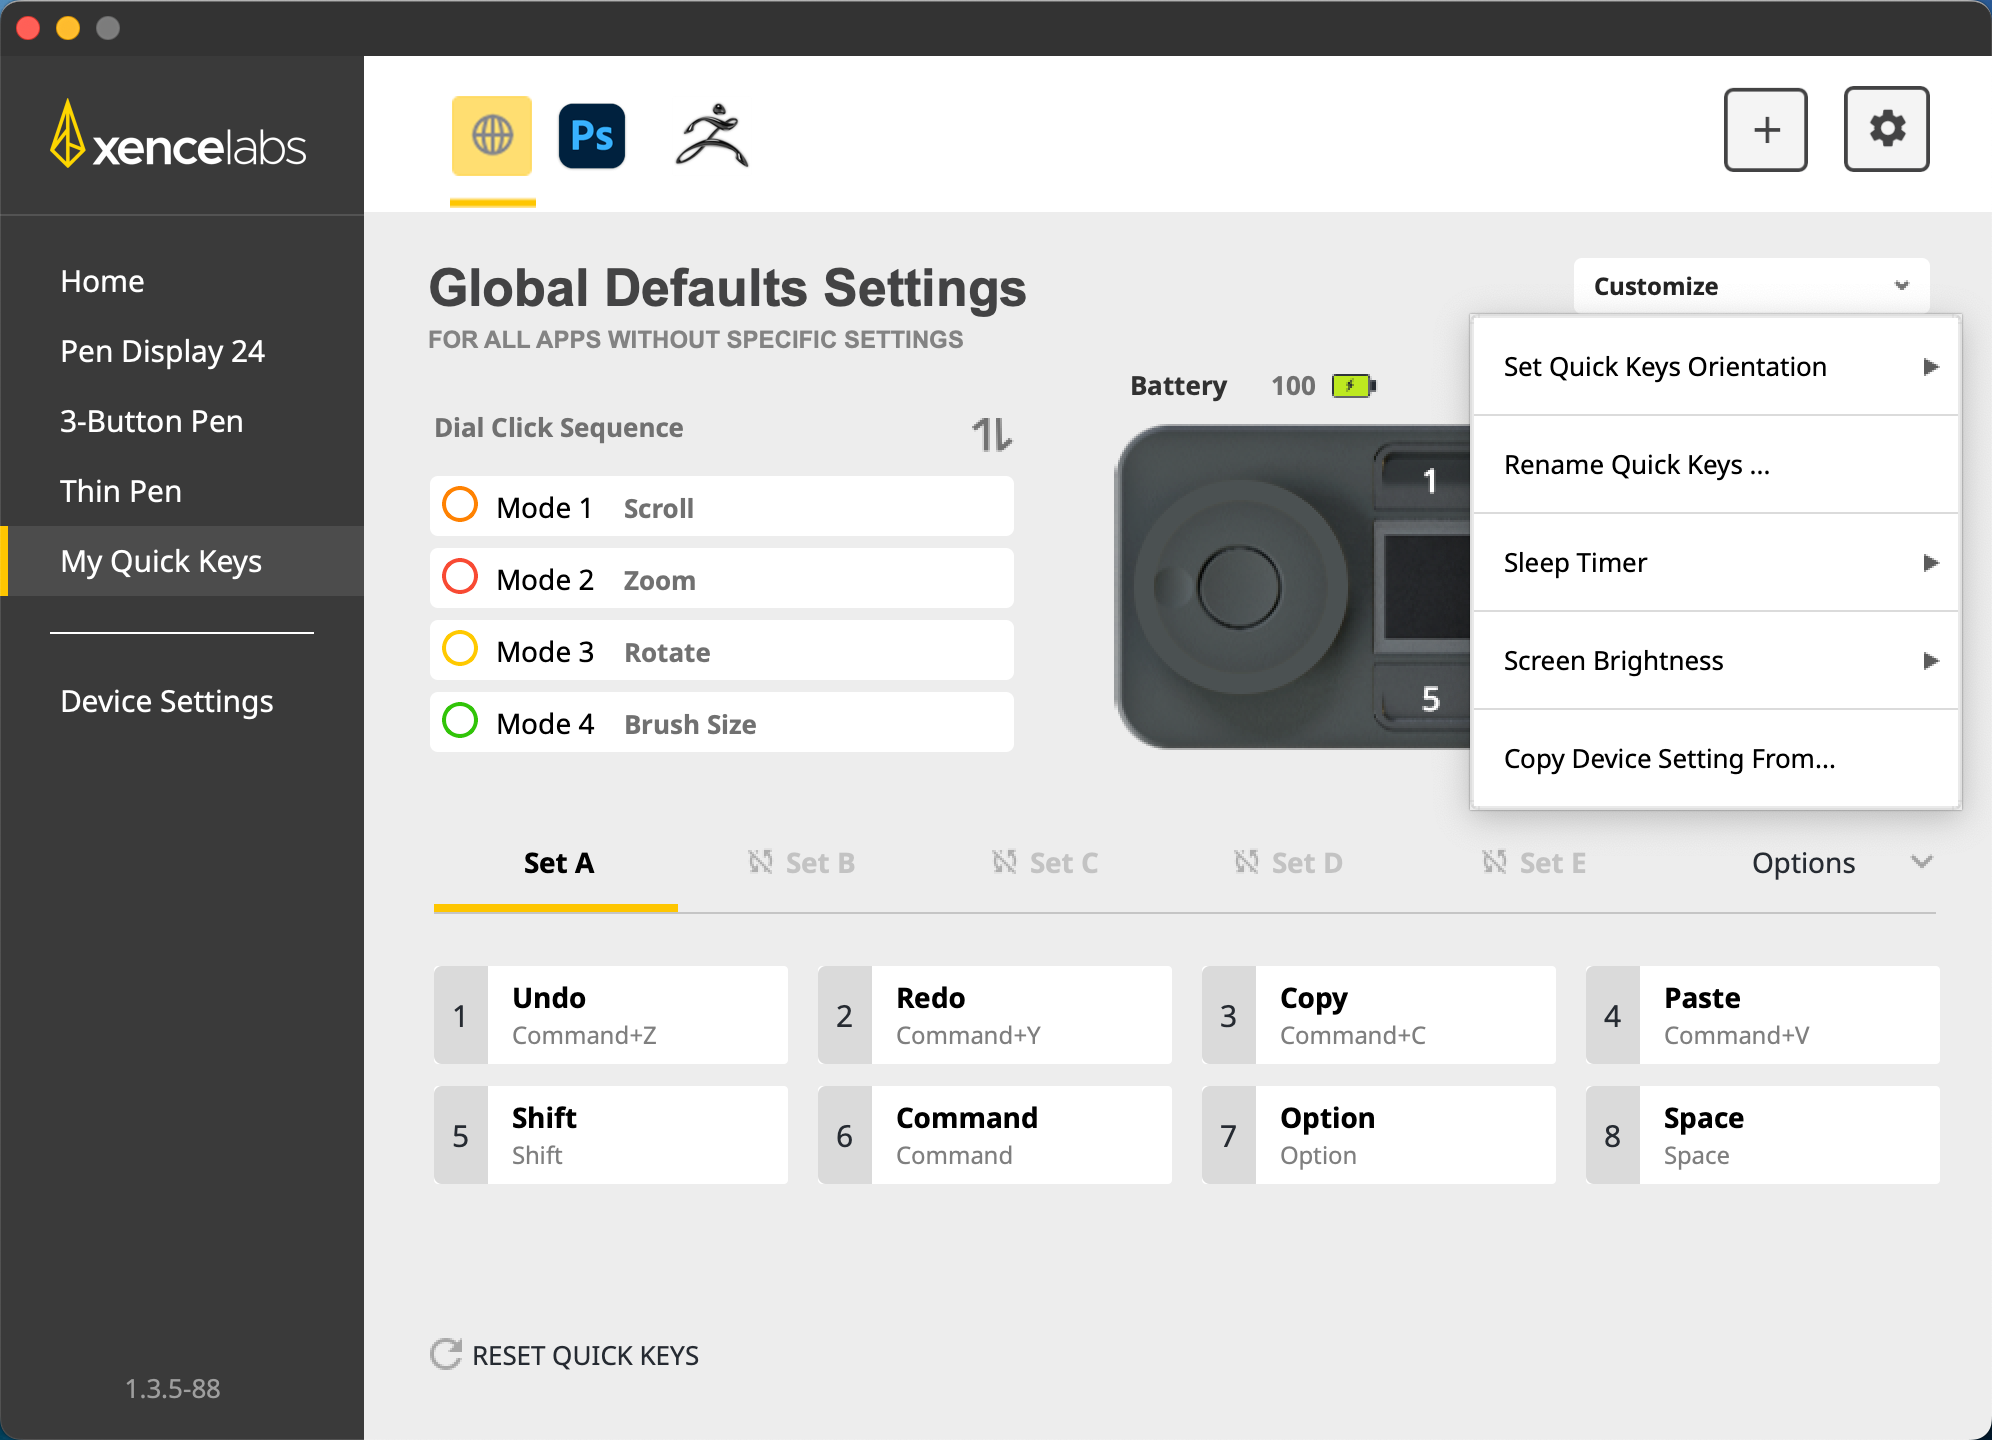
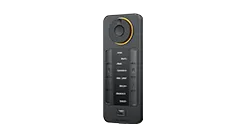
Physical dial that is precise, easy to use and can be used to increment certain functions (eg. zoom, brush size, etc.) as set by the Dial Mode Button.
Switch between up to 4 different modes per application. Each mode can be assigned a different color.
5 customizable sets of 8 keys per application for a total of 40 shortcuts per application. You can disable sets if they are not needed. For example, group your workflow activities into sets.
(eg. sketching, coloring, editing).
Allows you to switch between up to 5 shortcut sets.
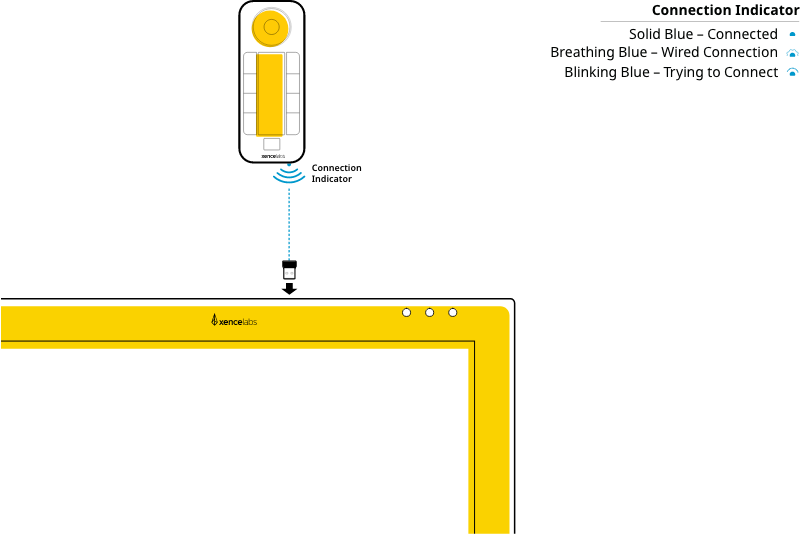
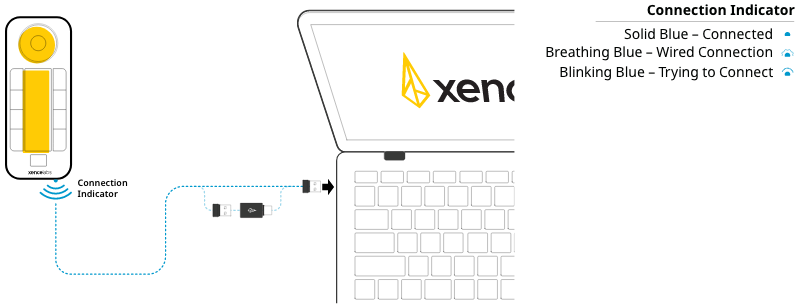
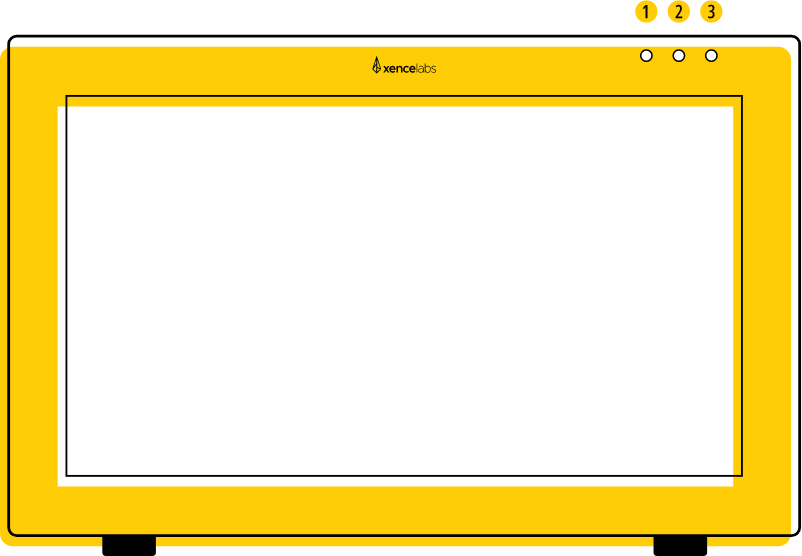
Blinking blue light indicates searching for connection, solid blue light indicates successful wireless connection and breathing blue light when connected via USB cable.
Slide and release to turn on/off. Adjustable sleep times are in the settings panel.
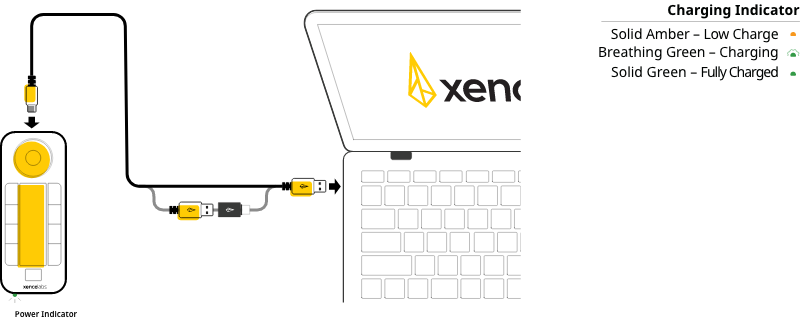
Solid green light indicates full charge, breathing green light indicates charging, solid amber light indicates the device has a low charge.
Displays shortcut key assignments.
The Quick Keys connects wirelessly via the dongle included in the pen case. The dongle can be conveniently slotted in to one of the USB-A ports at the top of the display.
Alternatively, you can also connect the dongle to your computer. A USB-A to USB-C Adapter is also included in the pen case for this purpose.
If the Quick Keys screen does not light up when switched on, please follow the directions for Charging the Quick Keys below.
Use the USB-A Ports at the top of the Pen Display to charge the Quick Keys via the included short cable (0.6m USB-C to USB-A 3.0).
You can also charge the quick keys through your computer, using the USB-A to USB-C Adapter if necessary.
Three convenient device control buttons give you quick access to the Pen Display 24/24+'s fully configurable options.
Launch Settings: Bring up your Settings Panel.
Adjust Pressure: Easily tweak your pen pressure.
Switch Display: Pop your pen cursor on to external displays using your Virtual Tablet.
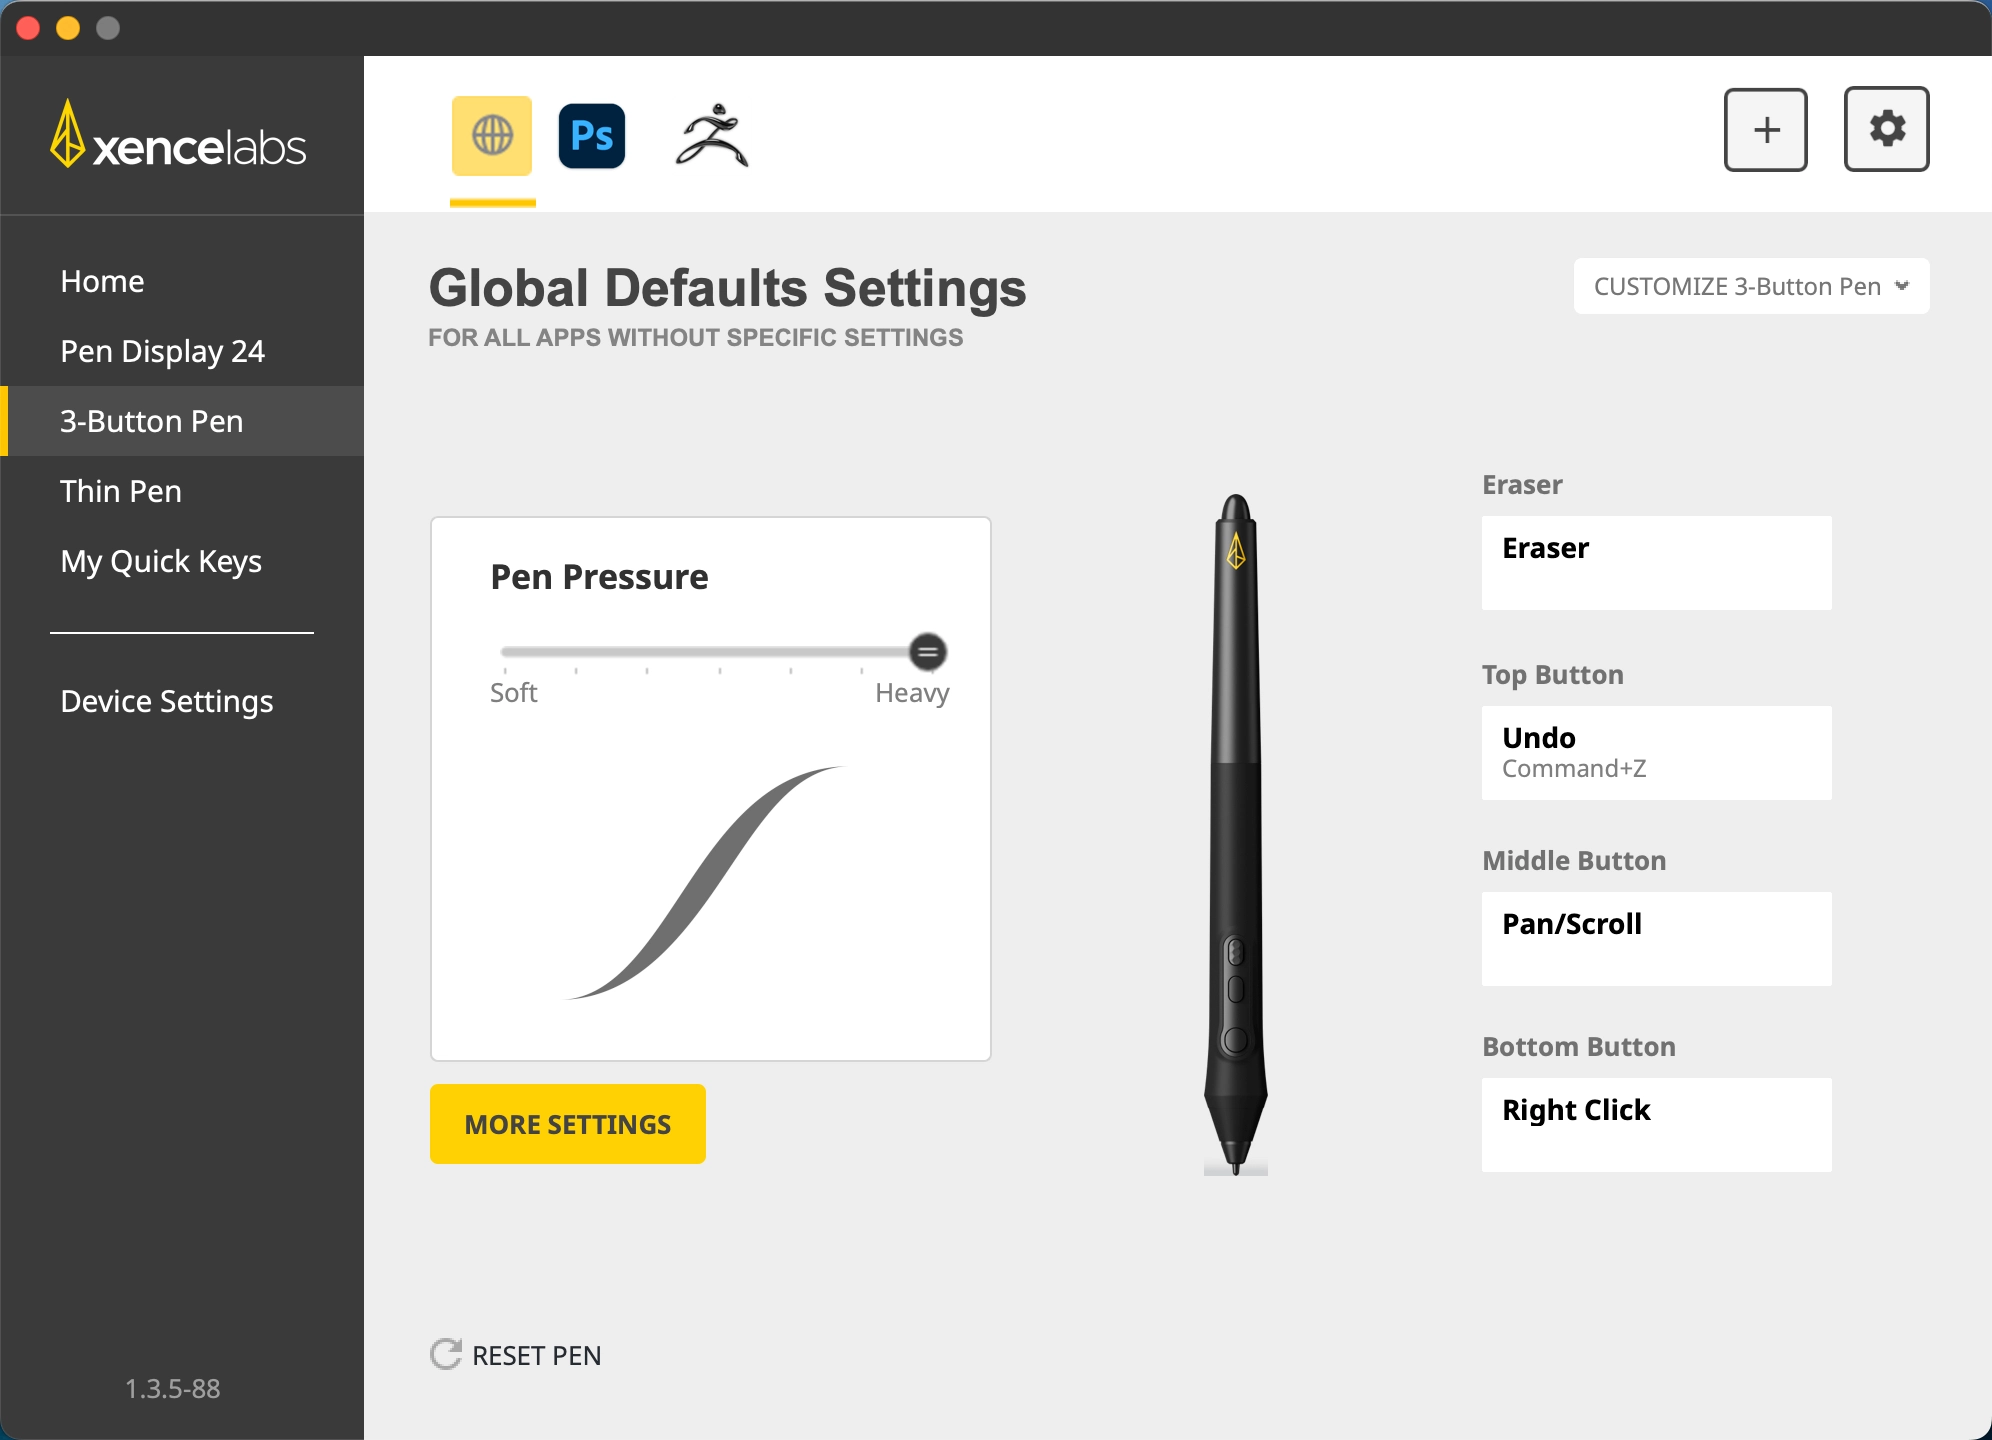
The left device control button launches the Settings Panel. This is where you can access and customize the settings for all your devices and pens.
The middle device control button pulls up the pen pressure adjustment panel for your active pen.
By default, the pen tip pressure is set to the profile that works best for most users. In the Settings Panel you can individually adjust the pressure of each of your pens to match your drawing style. You can also customize more pen settings including pen tilt sensitivity.
Default Settings:
The Settings Panel comes programmed with default settings for the Pen Display, pens and Quick Keys. These will be used in applications for which you don't have specific settings.
Individual Applications:
The Settings Panel also has application-specific presets for some popular programs such as Adobe Photoshop, CorelPainter, or ZBrush to name a few. If you have these applications installed, they will be auto-added to the application bar along with their presets which you can edit to your preferences.
Add Applications:
Add your other favorite applications to the application bar to create custom settings across all programs.
With the Virtual Tablet feature, you don't need to move to your mouse to reach items on other displays. Now you can simply press the right device control button and bring up your Virtual Tablet. Within this area your pen tip acts as a cursor on your other screens. Press the right control button again to switch between your displays.
In the All Displays mode you can even drag items from one display on to another, including on to your pen display.
The Virtual Tablet feature enables powerful new ways to manage your workflow. For example, you can leverage this feature with the eyedropper tool to color pick from photos or palettes on your other displays.
Pro tip: work even faster by assigning 'Switch Displays' or 'Virtual Tablet On/Off' to a button on your pen or Quick Keys.
In the Settings Panel you can choose the size and placement of your Virtual Tablet, and which displays to include in your Display Switch Cycle. This makes it easy to only toggle between the displays you want to control with your pen.
The Pen Display 24/24+ offers seven different color settings options. These include five standard color spaces, a Pantone® mode that provides Pantone Validated™ and Pantone SkinTone™ Validated color, and a fully customizable user mode setting.
Adobe RGB
sRGB
REC 709
DCI P3
REC 2020
Pantone®
Fully
Customizable
User Mode
Your pen ships already factory calibrated. However, if you feel the need to adjust how your cursor sits under your pen tip, you can do so using the Pen Calibration tool in the Settings Panel.
Should you find your hand in the way of system windows or want to purposefully offset your cursor for any other reason, you can do so using our tool in the Settings Panel. You can toggle this feature on and off.
The Quick Keys dial can be customized to perform four dual actions, such as zoom in/zoom out. The dial will glow the color of your choice to identify the current mode.
The eight buttons on the Quick Keys can also be customized in the Settings Panel. You can create and save up to five sets of actions for each application.
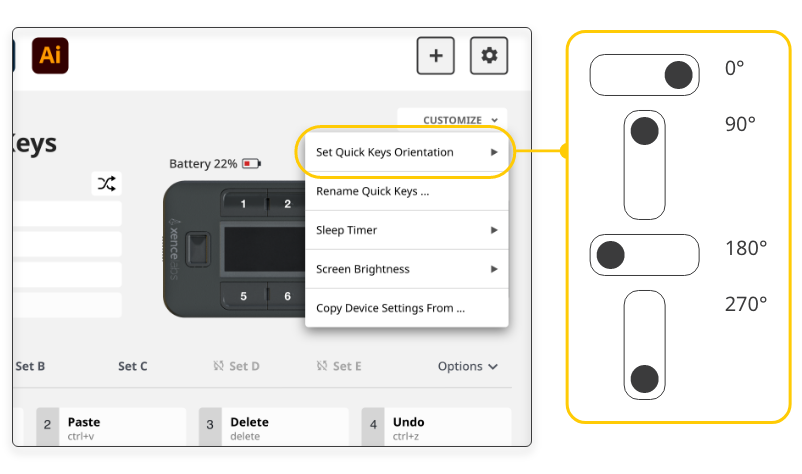
Because the Quick Keys can be used in any orientation, and attached to all edges of the Pen Display, you can also adjust its orientation within the Settings Panel. This feature can be found under the customize dropdown.
Register to join the growing community of creatives using Xencelabs products and receive access to benefits like:
Update Notifications
Tips and Tricks
New Product Announcements
Special Promotions
Xencelabs Events
Your product serial number can be found on both your box, and the back of your Pen Display.
What is in the Box
Getting Started
Key Features of the Pen Display 24/24+
Connecting the Pen Display 24/24+
Download the Driver
Key Features of the Quick Keys
Connecting the Quick Keys Wirelessly
Charging the Quick Keys
Key Functionality of the Pen Display 24/24+
Key Functionality of the Quick Keys
Register Your New Product
© 2026 Xencelabs Technologies Ltd. All Rights Reserved.
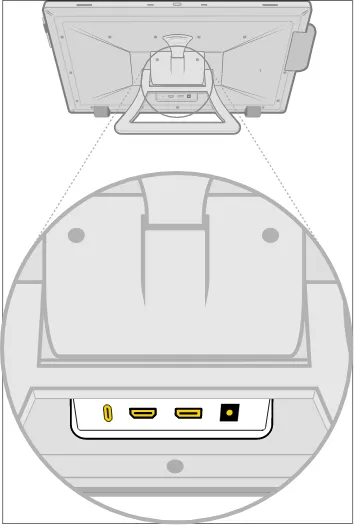 USB-C, HDMI, DisplayPort, and