


Looking for something fun to draw this autumn? Pumpkin spice is in the air, leaves are crunching under your feet, and Halloween is almost here; use these elements to gain some inspiration: grab your digital pen and learn how to draw a pumpkin step by step.
In this tutorial, we'll go step by step. By the end, you'll be able to draw a simple pumpkin (a Jack-o'-Lantern) and even learn how to add some realistic light and shadow. Let's get started!
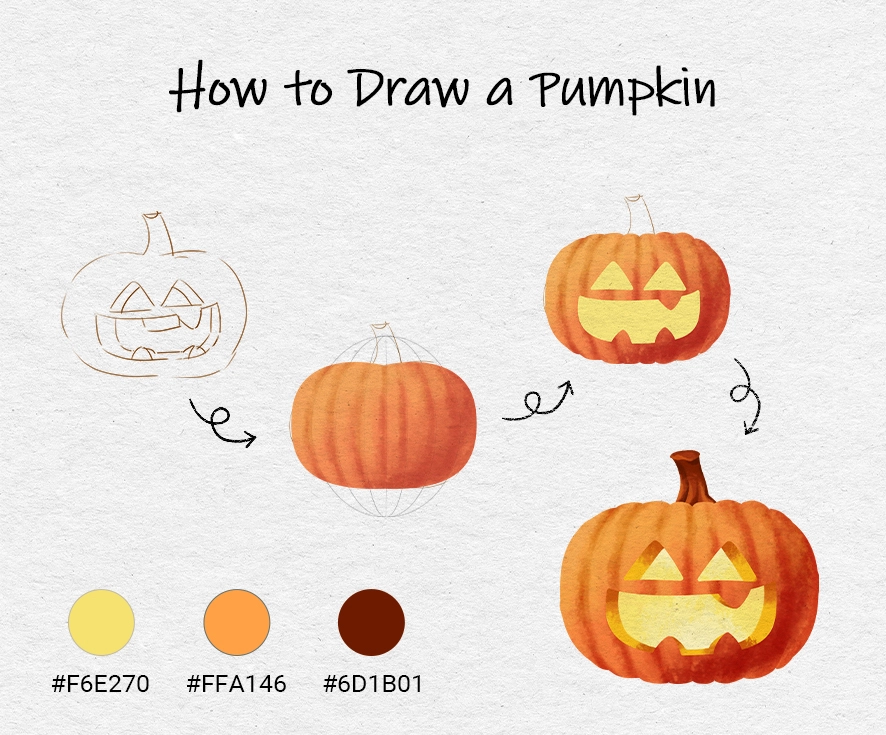
Step 1: Start with the Outline
Start your Halloween pumpkin drawing with a simple outline, any pumpkin you like as a reference.

Step 2: Add Guiding Lines for the Ridges
Based on the outline you've drawn, add an oval shape and fill it with color. Then mark two points at the top and bottom of your circle. Connect them with a vertical line, this will be your guide. Use it to divide the pumpkin into sections, just like the natural ridges you see on a real pumpkin. Don't worry about making everything perfect; a few extra guide lines will help make the shape more realistic.


Step 3: Lighting and Shadowing
In order to make the pumpkin look more 3D and realistic, considering light and shadow treatments is important. Let's assume that the light source on the pumpkin is coming from the left side, so the right side of the pumpkin is darker. Create some shadows for the pumpkin, and erase some shadows on the right to make it more natural.

Step 4: Deepen the Right Edges
Add more shadow layers along the right edge. Use gentle strokes to build up the shading, making the edges look smooth and rounded instead of stiff or flat.


Step 5: Add Highlights
To make your pumpkin look alive, it needs highlights!
Add a large highlight on the upper left.
This will show you the direction of your lighting. Then, add a few smaller highlights along the pumpkin's ridges, making it look shiny and realistic. On digital devices like a Xencelabs Pen Display, you can easily control the glow of your highlights by adjusting opacity and brush flow. You can even play around with layer blending modes to get that warm, candle-lit feel.

Step 6: Refine the Shape and Ridges
Now that your pumpkin is starting to take shape, go back and tweak the ridges a bit.
Don't worry about making them perfectly straight — curves and small irregularities make it look real.
Add some thin shadow lines along the grooves to give a little depth.

Step 7: Enhance the 3D Effect with more solid highlights
Add some brighter highlights and deepen the shadows between the ridges. This contrast will really bring out the pumpkin's shape and make it feel more 3D.

Step 8: Remove Guidelines and Draw the Jack-o'-Lantern Face
Here comes the fun part. You can now remove the guide lines, turning your pumpkin into a Jack-o'-Lantern!
Start with the eyes and mouth. Just follow the outline you drew in Step 1 and color them in. Use yellow to give it that glowing, lit-up look.

Step 9: Draw the Inside of the Pumpkin
The inside of the Jack-o'-Lantern is where the candle goes, so it should be brighter than the outer shell. Fill the interior with a light yellow or orange to give it a glowing effect. This not only fits the Halloween vibe but also makes your drawing look more realistic.

Step 10: Shade the Edge
Shade the edges of the cuts to give the pumpkin a hollow, 3D look. Darken the areas around the eyes and mouth a bit, this will help the candlelight pop. Add some highlights here and there to make the edges feel more real.


Step 11: Add the Stem
Finally, draw the pumpkin stem.
Sketch a little curved stem in dark brown. Throw in some shadows and highlights so it looks rough and natural, matching the rest of the pumpkin.

More Pumpkin Drawing Ideas!
• Cute pumpkin drawings with smiling faces
• Scary pumpkins with sharp teeth
• Halloween Pumpkin drawings with different shapes of hats
• Pumpkin drawing with fall leaves
Frequently Asked Questions
How to draw a pumpkin (Jack-o'-Lantern) face?
What makes a pumpkin face come alive are its eyes and mouth. With just those two details, you'll see its personality appear right away. A touch of shadow and highlight adds depth, and a few jagged teeth can give it a playful charm.
Where can I find pumpkin drawing references?
Search online for "pumpkin drawing reference" or "pumpkin pictures to draw" Look for photos that show good lighting and texture. You can also explore clipart pumpkins for stylized inspiration.
Whether you're using traditional pencils or digital tools, drawing Halloween-themed elements is a fun way to celebrate the season. Xencelabs has accompanied countless hobbyists on their journey to becoming artists in their own fields.
Among drawing tablets, Xencelabs stands out in 2025 with the v2 Pen Tablet Series

Featuring:
• A natural drawing experience with 3 g initial activation pressure and ±60° pen tilt
• Dual v2 Pens with different grips, shortcuts, and erasers
• Quick Keys remote with up to 44 customizable shortcuts
• HP Anyware® compatibility for remote work
• Stable Bluetooth 5.0 connection with up to 16 hours of wireless creation
• Ergonomic 6.5° sloped palm rest to reduce wrist fatigue
• Thin, streamlined 8 mm design for portability
• Large 16:9 drawing area for comfortable work
• Includes all the accessories needed for a complete workflow
• Highly compatible with Windows, macOS, and Linux
Our vibrant artist community also shares their artistic insight, tips, and tricks, helping you improve your skills and enjoy drawing, whether it's 2D or 3D. With the right tools and guidance, bringing your creative ideas to life has never been easier.